Free US Shipping on orders over $79!
Search
Close this search box.

Pool Ramp Leg Bracket Kit

$24.95

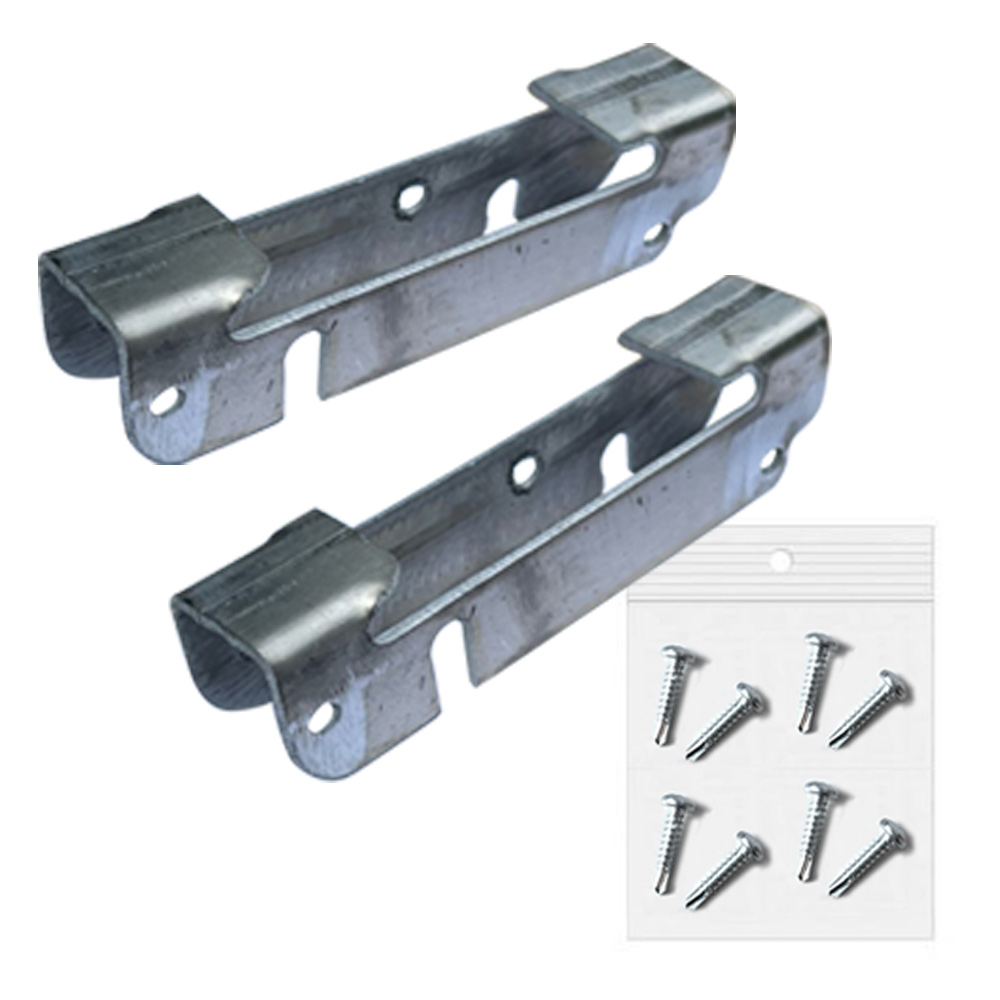
The Locking Leg Bracket Kit:

  • Locking leg brackets attach to your PetStep ramp to increase the stability & durability of the pool legs.
  • Perfect for people who have purchased the pool ramp in the past and want to make it more robust.
  • Does not include PetStep ramp or pool leg kit.
SKU FG-PS-228-LLB Category

Product Description

Already purchased the PetStep pool ramp in the past and looking for a bit more stability? If you have a large or active dog, the Locking Leg Brackets fasten to your ramp to create a more secure and stable attachment point for the pool legs. These brackets are custom-made by our team of engineers to permanently attach to the most structurally sound part of the ramp, the structural spines running down the middle.

Note: The current PetStep Pool Ramp bundle and Pool Leg Kit in our shop already include the locking leg brackets, so you donā€™t need to purchase them as an add-on!

How Do the Leg Brackets Work?
Simply slide the plate of the pool legs through the brackets from the middle of the ramp outwards. The brackets are especially secure, so it might take a little wiggling to properly place them through the brackets. Once the pool legs are in place, secure them with the thumbscrews and your pup is good to go!

Once pool season is over, you can remove the legs and place the ramp into storage. The brackets are low profile enough that they still allow the ramp to close in half.

How Do I Install the Leg Brackets?
The leg brackets install onto the structural rib on the end of the PetStep ramp. After positioning the brackets, they are secured to the ramp using the included self-tapping screws, so youā€™ll need a power drill for installation. For more specific instructions, we have detailed step-by-step instructions for installation.

Specifications

Weight 16 oz
Dimensions 6 × 4 × 4 in

Video

Use Cases

Care/Upkeep

See our post on How to Properly Care for Your PetStep Pool Ramp here,

Downloads

Instructions

Instructions

Attach the Brackets to the ramp

  1. With the ramp open and the bottom end facing you, place the leg brackets on the structural ribs of the ramp. The end of the bracket with the pre-drilled holes on either side should be facing the middle of the ramp. Tap the brackets down onto the rib.
  2. Once the brackets are loosely in place, slide two legs from the center of the ramp into each bracket and loosely tighten down the legs using 6 of the thumbscrews.
  3. Push down on the top of the locking leg brackets so that the lip of the bracket comes to within 1/16ā€ of an inch of the leg baseplate. Be sure the lip of the bracket is NOT touching the leg baseplate.<br<
    There MUST be some space, about 1/16ā€, between the baseplate of the leg and the top lip of the bracket.
  4. On the top end of the bracket, drive a screw through each side, into the structural rib. Itā€™s essential that there is space between the top of the bracket and the leg base when doing this.
  5. With two screws inserted in the top of the locking bracket, push down on the bottom of the bracket so that the lips on the top and bottom of the bracket are at least 1/16ā€ away from the leg baseplate, but NOT touching the base of the leg.
    This is the critical step as the leg MUST be able to move within the bracket. Drive a third screw into the inner side of the bracket.
  6. Undo the thumbscrews and remove the leg. Ensure the leg can be removed and inserted into the locking bracket with a little tension. Drive the final screw through the last pre-drilled hole on the outer side of the bracket. There should be two screws driven into each side of the bracket (4 total for the bracket) to secure it. Finally, check again that the leg is able to slide in and out of the bracket.
  7. Repeat on the other side.

Secure the Pool Legs to the Ramp

  1. Slide the pool legs through the cutout in the bracket (from the center of the ramp outwards) so that the holes of the plate align with the three threaded inserts. Make sure that the legs splay outward from the ramp, as pictured.
  2. Use six of the thumb screws to hand-tighten each leg to the ramp.
  3. Align the cross brace with the threaded inserts located on each of the pool legs. Use the remaining two thumb screws to secure it to the legs.

Reviews

There are no reviews yet.

Be the first to review “Pool Ramp Leg Bracket Kit”

Save 10% on Your First Order

Join our email and SMS list. Unsubscribe at any time!